

Link Lever Spring Swap Instructions
These instructions will show you how to change out your suspension springs in your Link Levers. Please read these instructions carefully, and follow each step of the process. Take your time! It is a good idea to get a little bowl or dish to keep all the parts together.
Tools Needed - T20 Driver, 2 screwdrivers (1 Phillips head, 1 Flat head)
1. Remove your Link Levers from your boots, using your T-20 driver to remove the 2 screws attaching the Link Levers to your boots. Set the screws aside in your dish.
2. With the lever removed from the boot, flip the base so the long side is pointing up . THIS IS EXTREMELY IMPORTANT . With the base in this position, it moves the flip spring out of the way and you can get access to the axle screws .


3. Taking your two Screwdrivers, you will remove your axle screws. Be sure that you have a good grip on the heads of the screws; you dont want to strip them. Hold the flathead screw securely, and then unthread the phillips head screw . Once you remove the Phillips head screw , you can use the screwdriver to press the axle screw out of the base. Set both screws aside in your dish.


4. Once the axle screws are removed, the next step is to remove the base from the Link Lever. You will do this by pressing it upwards and it should pop out. Be gentle , as you do not want to damage the flip spring . Set the base aside in your dish.


5. With the Base removed from the Link Lever, you can now easily unthread the shaft from the body. Turn it to the left until you can remove it from the body. Set the shaft aside in your dish .
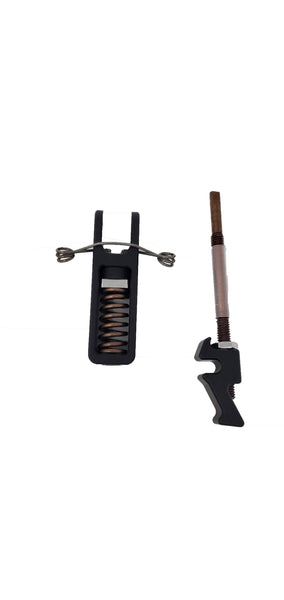
6. With the shaft removed, you can now easily press the suspension spring out of the Lever Body. Once removed, you can replace it with the new suspension spring of your choice. Simply press the new spring into place, and now we are ready to reassemble the Link Lever!

7. To start, you will need to thread the Lever shaft back into the body. Press it into the body gently, and carefully thread back into place. VERY IMPORTANT NOT TO CROSS THREAD ! IF YOU FEEL RESISTANCE, STOP, BACK IT OUT AND TRY AGAIN.
Thread it all the way until it stops. You will likely need to back if off a quarter or half turn so the top of the shaft is oriented correctly. This is important for putting the base back on in the next step.


8. Once the shaft is thread back and oriented properly , the next step is to re install the base. VERY IMPORTANT : MAKE SURE THAT YOU REINSTALL THE BASE WITH THE LONG SIDE OF THE BASE IN THE "UP POSITION" (EXACTLY HOW IT WAS WHEN YOU REMOVED IT ) (PHOTO)

Gently press the base back into place , so the flip spring pops back into the groove on the base. Be sure that the holes in the base are aligned with the holes in the body.

9. With the base back into place, you will need to reinstall the axle screws. Start with the longer axle screw (photo, screw specs) , and press the the screw back through the base and body of the Link Lever. This may take a bit of fiddling to get it lined up. Just take your time, and be gentle.

Once the long screw is in place, reapply blue loc tite to your small screw and thread it back in. The loctite is very important ! Be sure you dont cross thread the screw as well. Once you have it reinstalled, take your 2nd screwdriver and use both screwdrivers to tighten the axle. You want it to be tight, but dont strip the heads.


10. Now with the Link Lever fully reassembled, check to make sure that
- The axle screws are tight
- The shaft is straight in the base, not rubbing
- The head is oriented correctly, with the jam nut properly tightened.
11. Assuming that your Link Lever passed your inspection, you will now need to flip the base so that the short side is upright . Your Lever should look like this.

12. Reinstall the Lever to your boot using your T-20 driver. Be sure to reapply blue loc tite , and then tighten your screws down to the boot. Be sure to check that the base is sitting flush against the boot , and that there is no play in the Lever/Boot interface. (photo)
13. Do a quick visual inspection to make sure that you reassembled your Link Lever correctly , and check to make sure that your Lever is operating properly.